Probably My Favourite Trousers

Hello!👋
Hope you have been keeping well!
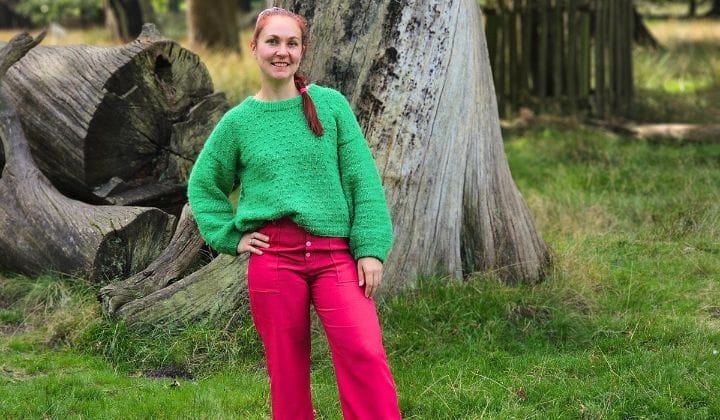
I think I have made what will become my favourite pair of trousers!

These came together so nicely and I really took my time with them!
I wanted to get my topstitching done properly as there is no print on the fabric for it to blend into if it’s not straight. 🤭

I didn’t have any buttons that I really liked in my stash for these, so I made my way to Hobbycraft to see what they had.

There weren’t really any buttons that I particularly loved, but I liked these and thought they would be a good fit for the bright pink fabric.
They were larger buttons than what the pattern called for, but at this point I hadn’t really given it much thought.
I got home and tested making a buttonhole on a scrap piece of fabric and I quickly realised that I would not be able to use them.

Look at the size difference between the top and bottom buttonholes!
I am so glad I tested it first because the buttonhole for these new buttons was a lot larger than the space available on the button fly. 😏
So that meant I had to go back into my stash again and make due with what I already had. 😂
I don’t make trousers often, but I love the construction and fitting of these Lander Pants.
You get to a point where you have sewn everything, except the waistband, and just baste the side seams.
Like this you get to try them on and adjust how much you need to take it in or let it out.
I am so glad this step is there as a reminder to try on because I had to take a smaller seam allowance(I have gained a few centimetres in the area since I last used the pattern).
So it was easy to remove the stitches and baste a new seam allowance in to try again.
One thing that slipped my mind, yet again, was to lengthen the legs. 🤦🏼♀️
I keep on doing this in nearly every project I have made these last few months, you would think one would learn from this, but no, not me apparently. 😑
All I could do was take a smaller hem allowance for it to be at the point I wanted it to, and it worked out fine this time. 🙂

As soon as I finished these Lander Pants by True Bias, I started on a new project! 🤭
This one was time sensitive, because it’s the gift I wanted to make for our friend's baby shower today, Sunday.
I used my self-drafted pattern again, the same one I used to make the bags for my daughters, and made some more changes to it to be more baby friendly.

I made an opening on the front pocket to be able to put wipes on the inside. I found that the opening on the bag that was gifted to me was too big, so I drew a smaller hole on this one.

I also put a snap on the pocket to keep the packet of wipes from falling out.
On the inside of the bag, I put pockets on both sides, because I think you can never have too many pockets to store the things you need for your baby.

I also colourblocked the inside by putting the pockets on a different coloured lining piece. I hope my friend likes it.
All fabrics that I have been using lately, including for these projects above, have all come from my stash! 🤩
Even though slowly, I am glad I am sewing a little of my stash down.
I do enjoy having a stash most of the time because I can just pick a fabric up and make something. But there are also times where I feel overwhelmed and don’t know what to make because there is just too much choice.
Depends on the mood of the day. 😂
I also tried something new this week!
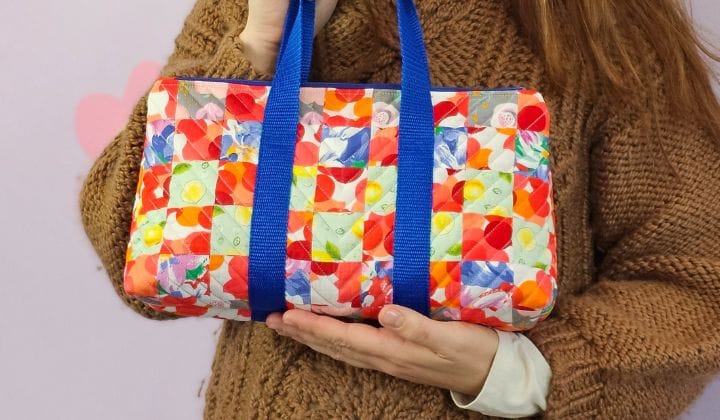
I am making my first quilted pouch with some of my scrap fabric! 😀

I have been wanting to try out quilting for a while now, and I have quite a bit of scraps, so I finally got down to it.
I had quite a bit of pink fabric jump out the bag at first, so I decided that was going to be the tone for the pouch.
I watched quite a few Youtube videos for the type of scrappy pouch I wanted to make, but when I got down to it, it looked easier than it was. 😅
I planned the layout out, but when it got to piecing it, I got a bit confused because there were some pieces that I was going to join and some raw edges would end up being on show. 😣
I managed to do it all my own way, and after piecing and quilting both pieces, I decided to watch another video and figured out where I could have done better! 😂
I was doing a sew and flip method straight onto the batting, but didn’t realise one important part to make the process easier. 😑
Sew pieces together that are of the same length, not sure I am explaining this properly.
Because I didn’t do this, there were some parts where I had to turn the fabric under so the raw edge wouldn’t show before joining it to another piece of fabric.
Anyway, I now know a little more and I hope round 2 flows easier!
I am happy with the way it is looking, but would prefer a more organised layout next time, like squares or stripes.
I haven’t even finished it yet and Miss C, my eldest daughter, has claimed this pouch already! 😒

This MIGHT just give the push I need to finally sew a quilted jacket, more specifically, the Quilted Jacket from The Great British Sewing Bee book.
I only bought the book because of that pattern the year it came out, I think 2 or 3 years ago now.
I have gotten as far as tracing my size off, but I think I will have to redo it as I have since changed size. 😂
This weekend saw us take a drive to Dunham Massey for a nice stroll and to spot some deers.


There were so many of them and so close by! They seemed very tame.

I thought it was funny that there were signs saying not to touch or RIDE the deer! 😲
RIDE… 😳
For it to be on the board, that must mean someone has tried to do it before! Shocking!
Well, for the car ride, I took my Jasmine Sweater to keep me busy.
I managed to start a sleeve and nearly finish it actually.

I am busy knitting the last few rows of ribbing and I remembered to make it a little shorter than the pattern instructions. I knit the bubbles for 20 cm instead of 37 cm, so I basically only sewed half the sleeve.

Do you knit too? What sort of things do you like knitting? Let me know!
😎Confidence Corner:
“The numbers do not define you.” - Christine D’Ercole
Numbers don’t define who we are.
Whether it be the numbers on our scales, our age, our bank account balance or how many likes our posts get on social media, none of these measure our true worth.
Our worth lies in our character, in our kindness, the effort we put into our work and the influence we have on those around us.
Numbers go up and down, but who we really are stays the same!
Let’s not get distracted by the world’s measurements, but rather focus on our unique journeys!
🧵Today's Sewing Tip:
How to Make a Cutout on Fabric
Cutting shapes out in fabric is a great way to add some interesting features to your project.
This week I needed to add a cutout to a nappy pouch I made to accommodate a pack of baby wipes.
So let me show you how I did it!
First, you will need 2 pieces of fabric.

One will be the main panel and the other will be, let’s say, the lining panel.
My panels were both the same size because this part was going to be a pocket and you would be able to see both sides of the pocket.
If you are going to create a cutout on a sleeve of front bodice, you need a lining piece that is a little bigger than your chosen shape.
Also think about what your main fabric is if you are sewing this on a garment. If the fabric is thick, you may want to use a piece of interfacing instead of the same fabric, this will reduce bulk.
Draw your chosen shape onto the fabric.

I drew some lines to find the centre point of my fabric and then free hand drew an oval shape with the help of some extra lines.
You can use a template instead if this is easier for you.
Lay your fabric right sides together.

I added a layer of batting to give my bag some shape. This is optional and also depends where you are making the shape.
Pin the layers together and sew.

Pin your panels together and stitch exactly on top of the lines you drew.
Take your time and go slowly.
Cut out the shape.

Fold the fabric in half and make an incision in the middle of your sewn shape.

I tend to make lots of cuts in this area so it is easier for me to take my pinking shears in and cut right around, leaving about ¼ seam allowance.

Making a few more slits in the round areas or sharp corners of your shapes will help the fabric turn and lay better later on.
Fold the lining fabric into the hole.

Take one layer of fabric, the lining layer and push it through the hole you just cut out.

The fabric will now be wrong sides together. If you added a layer of batting, it will now be sandwiched between the main and lining panels.
Press.

Give the panel a good press, making sure that the lining fabric is not visible from the outside. Rolling the seams between your fingers and pressing will help lay everything flat.
Topstitch.

Topstitch around your shape using ⅛ inch seam allowance.
Here you want to take your time to make sure your stitches are straight to give a more professional finish.
Give it one last press.
⭐My Favourite Things This Week:
- Finishing my fuschia pair of Lander Pants! 💗
- Continued progress on my Jasmine Sweater.
- Sewing up the gift for my friend in one morning! 😮
- Starting my first scrappy pouch! 🏆
🗓️Upcoming Plans
- Continue working on the Jasmine Sweater knit.
- Make another scrappy quilted pouch! 🤭
- My partner’s jacket - we have finally decided on a new pattern, so this will start sometime soon. 🤞
🎉Upcoming Events
21st of September 2024 - Sew&Bond - Sewing Social Event - in Gatley Hill House, South Manchester, 11:45h - 17:15h
Email bianca@beesilva.co.uk and quote reference: SEWBOND09
For more information: https://www.beesilva.co.uk/sewbond09/
26th of October 2024 - Sew&Bond - Sewing Social Event - in Gatley Hill House, South Manchester, 10:15h - 15:45h
Email bianca@beesilva.co.uk and quote reference: SEWBOND010
For more information: https://www.beesilva.co.uk/sewbond010/
3rd of November - New Workshop ALERT! Stay tuned 💖
Question of the Week:
Do you knit too? What do you enjoy knitting the most?
Sign in below to leave your answer please!
Thank you so much for reading it! And if you enjoyed it, please tell a friend about it to allow me to reach more people. 🥰
Bye for now,
B! xx


Member discussion