Another one that doesn’t fit!
Bianca SilvaA couple of weeks ago now, I cut out a Ruby Skirt at my sewing social.
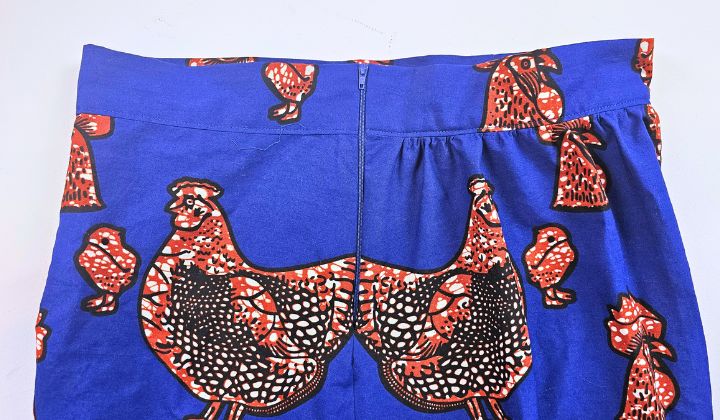
I omitted the button placket down the middle of the front skirt because I didn’t want to break up my print.
A large beautiful chicken print on a royal blue background.

Somewhere along the line, a miscalculation happened and I only realised once it was too late.😐
I sewed up the side seams, gathered the front skirt and attached the waistband.
At this point I tried it on because I wanted to figure out how much elastic I wanted to insert in the back waistband.
And that’s when I found out I can't do maths anymore!😂
It was really hard to get over my hips!
When I omitted the button placket, I didn’t think of adding the width of the placket to the skirt piece. I simply removed it and cut on the fold.
That inch from the button placket was the exact measurement I needed to be able to get the skirt over my hips with no issue.
I did consider just continuing and putting up with a tight squeeze to get it on and off.
But then I also thought I would probably not reach for it much then.
So, I unpicked the side seams(overlocked and all🤦) of both the waistband and part of the skirt.
I added a zipper and it looks ok, but I would have preferred an invisible zipper.
I have used all the invisible zippers in my stash, so I made due with what I have.

But it definitely goes over my hips now.
Then on Saturday evening, during a ThreadySetGo virtual sewing social hosted by SewHayleyJane, I managed to get some more of the skirt done.
I neatened the zipper (it was looking wonky) and topstitched the waistband in place… only to realise once it was done, that I forgot to insert the elastic for the back waistband! 🤦🏼
So I unpicked a little opening by each side seam and left it there.
Still during the virtual session, I also unpicked the waistband of my Sarah Skirt(NH Patterns) that came out too big so I can take it in later.
I didn’t want to do any more work on my skirts there and then, so I reached for the scrunchies I cut out weeks ago that match my hacked pink Sabina Skirt.

I only made 2 of the 3, I will get the last one done next week so me and my girls can finally have some matching scrunchies!
-
I am still busy planning my sewing challenge #sewbloodpressure25, and I have been contacting some sponsors so you can look forward to being in with a chance of winning a prize at the end! 😀
Once I have the final list of sponsors, I will let you know who they are.
If it’s the first time you are hearing of the challenge, please check this poster below on how you can participate.

-
My purple sweater is getting closer to being finished, but still not there. 🙃
I am actually getting a little bored of working on it.
Weaving in all the ends is being a pain in the bum! 🙊
I have spent roughly 3 hours this week just weaving in ends and I am only a little over half way done.

It’s been to Karate lessons, car rides, and a few random moments throughout the day, but it feels never ending!
And I still need to crochet the rows on the sleeves. 😵
This Week's Tip:
How to quarter elastics, neckbands, etc.
I remember when I started sewing I had to watch a couple of videos to help me understand what it meant to quarter the pieces I was working with.
This week, I needed to add elastic to the waist area of a dress and I am sharing that with you today.
My waist measures 29.5 inches. To keep the elastic a little more snug, I removed one inch from this measurement and cut 28.5 inches of elastic(next time I would remove a little more).
I tried something new to me, and joined the ends of the elastic using a piece of bias tape and sewing a box with a square to keep it secure.

Then I folded the elastic flat in half and put a pin through the middle points.

I joined the pins and folded the elastic flat again to find the middle points between these pins.

I stuck a couple of pins through these middle points and now my elastic was in 4 equal parts.

You can use this same method to divide any neckband, waistband, cuff, etc. that needs to be joined evenly to another area.

News Corner:
Understanding Sewing Machine Needle Sizes and Thread Weights
It happens to all of us. You need to find a sewing machine needle for your latest project. Selecting the correct sewing machine needle and matching thread weight can be confusing for beginners and even experienced crafters.”
Read the full article here:
https://thejewishvoiceandopinion.com/understanding-sewing-machine-needle-sizes-and-thread-weights/
Videos I posted this week:
What I Made This Week | WEEKLYBEE EP13
Sew a Ruffle Tote Bag from Scraps | Easy DIY Project
Upcoming Events:
Sew&Bond - Sewing Social Event - 24th of May 2025
My First Pattern:
Thank you so much reading! And if you enjoy reading, please tell a friend and leave a comment!
Until next week, happy creating!😘
Bye for now,
B! xx