A New Project!
Bianca SilvaHello, hello!
This has been quite the week with so many celebrations!
It was my youngest daughter and my partner’s birthday, plus another sewing friend, Gilly, who happens to share a birthday with my daughter.
I’ve had so much cake this week, I’ve had enough for a little while. 😂
I need to recover now in time for my birthday that is also coming up in the next few weeks!
Something else coming up next week is that I am going to the Knit&Stitch festival in Ally Pally!
It’s going to be my first time at the London one and I’m really looking forward to it. I’m going to be there Saturday morning, so let me know if you’re going too so we can say hi to each other!
Stitches of the Week
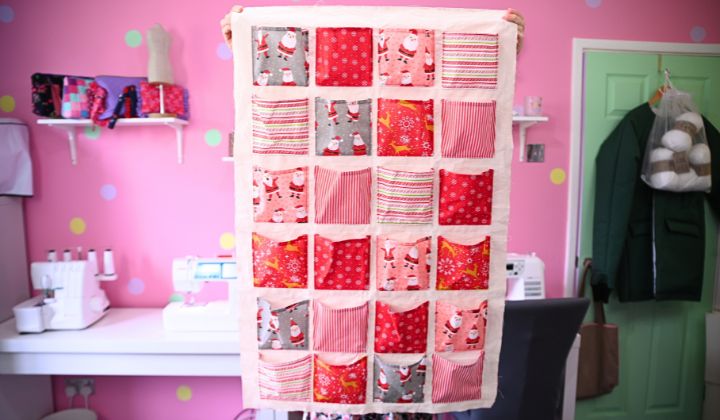
BeeSilva - Advent Calendar
All 24 pockets are stitched on! 🥳
But I didn’t prewash any of the fabrics before cutting them up and some of the polycotton shrunk when I was pressing it. 😑
That means the pockets are a little bit wonky in places, although I don’t think you can actually tell when I hold it up.
I stopped working on it for a few days because I needed to get some dowels to be able to hang it up and one of the lovely ladies, Sally, who comes to Sew&Bond™ gave me some that she no longer wanted!
They look like they will fit perfectly, so I can now create the channel and hem the sides, which is hopefully going to be what I do next week.
Because this was on hold, I cut out another 24 pockets, pressed and topstitched them for the second advent calendar I am doing.
You know, one for each daughter otherwise there is drama.
I took it to Sew&Bond™ yesterday to see if I could work on the pocket placement, but I think you know what I managed… nothing! 😂
So let’s see if I can do this this week as well.
I actually still need to cut the calico and measure out the pocket placement first. 😣
But I am super happy that they are both in the works after wanting to make one for years!
And after my sister saw the half finished calendar, she now also wants one for her son. 🥰
He will be 2 years old this December, so I don’t think he will be that interested in it now. I will make him one for next year when he understands a little more.
Fabric: Calico for the backing, polycottons for the pockets.
The Drama: Pockets have shrunk with the pressing and now a third calendar has been added to the list! 😂

BeeSilva - Sew&Bond™
We had another great day at Sew&Bond™ this weekend!
We got to meet a few new people, as well as catch up with others, and it’s so nice to see everyone just get along! 🥰
We keep these events to a lower number of people because we want everyone to be able to chat to everyone else in the room and not feel overwhelmed with large groups. Plus it also gives me the chance to be able to have a chat with everyone and get everyone lots of tea!
In this session, we had a lovely lady, Anjalin, sew up her first project, a tote bag that we drafted together! And we celebrated the birthday of a friend, Gilly! 🎉
Just before the end of the day, we surprised her with a card ,a Pastel de Nata tart , one of her favourites, and we sang happy birthday! 🥳
There were so many other projects in the works like dresses, trousers, blouses, aprons, alterations and a zippered pouch!
Thank you so much to everyone that comes to these events! We have built and continue to build a nice sewing community in the area and I always look forward to seeing you there. ♥️
All spaces are now sold out until the end of the year, but we already have dates for the whole of next year and we will be releasing those dates soon.
If you have any suggestions at all in relation to these events, even if you would like these to run on another day of the week, please feel free to email them to me, I am happy to take any feedback onboard.

Two O Nine Fabric - Hanbok Vest (Sewing Therapy)
I’ve finally made a start on this and I am already so excited how it’s looking!
I haven’t done much though. 😂
I’ve cut the fabric out much larger than the pattern piece because I am quilting it, so I need some space for the fabric to shrink with all the stitches before cutting it accurately.
So one side is going to be with the wool mix fabric and for the other side, I decided o cut up a skirt I wasn’t reaching for much. 😅
I asked for some help on Instagram to decide if I should really cut it up or not, plus it lay on my table for a few days before I built up the courage to cut it,
Eventually I did and I had just enough fabric for all vest panels without having to piece any together.
Then I used some left over wadding (still from my partner’s jacket, we’ll not talk about this one 😂), pulled it apart into three layers so I could quilt one layer of wadding to one of fabric.
If I had left the wadding as it, it would be too thick and would make me look stick like when wearing and moving around in it, so I thought it would be best to separate it.
They are a bit wonky in places and didn’t come apart evenly all over, so some parts have torn and are not fit for use.
There are 6 panels to quilt, 2 back pieces and 4 front pieces, and so far I have done four.
I am so excited by how it’s looking!
I drew a grainline on the fabric as a starting point and used a 45 degree angled ruler to mark a line crossing each other to help me form diamond shapes. Instead of drawing lots of parallel lines, I just drew one in each direction and used the quilting guide on my sewing machine to get the correct distance between each.
I am so happy this project is finally on the move after years of wanting to make one!
Fabric: the cream and black is a wool mix, the polka dot is a cotton poplin and wadding
The Drama: I cut up a skirt I made to use the fabric for one side of the vest! PLus there is a lot of quilting going on!😅
The Win: I am finally working on a quilted garment for myself! I have only ever quilted for bag making.

Skill Builder of the Week
Topstitching
This weekend during our Sew&Bond™ event, topstitching came up in quite a few projects, so this is the perfect time to bring it up here.
I love a bit of topstitching in my projects, I feel it gives most projects the perfect finish and a professional look.
And topstitching isn’t just decorative, it can be functional too. It helps seams lie flat and it can reinforce stress points.

Here are things I do when I topstitch my projects:
Needle and thread - I use the same needle and thread that I sewed the project in. If I were to be working with denim, I would change to a topstitching needle and thread (it’s thicker) which would make the stitches stand out more against the fabric.
Stitch length - I set mine to around a 3-3.5mm length depending on the thickness of the areas. This longer length makes the stitches look a lot neater.
Straight lines - This one is super important because this makes or breaks the finish for me! I always focus on a point on my presser foot or needle plate to keep my stitches straight, never at the needle. This helps keep a straight line so much easier.
Pressing - If I am working on garments, I always press the seam before topstitching, but with bags it depends on how I feel and how it’s looking. 😅
Thread colour - Most of the time I match the thread colour to my fabric, but I have used a contrast colour on a few projects. It just makes wonky stitches stand out more, so even more important to get straight stitches!
Maker Spotlight
This week’s spotlight was chosen by my daughter and it goes to @sewingwithdaisy!

Tsafra made this shirt for her brother and questioned herself about her fabric choice.
I think it’s a beautiful print, very well made into a shirt and her brother looks super comfortable in it! 😍
The pocket is so well pattern matched and the label detail is such a nice touch too!
The pattern is the Fairfield Button-Up from Thread Theory Designs.
Want to be featured in my newsletter? Just reply with a pic of your make. I’d love to see what you’ve made!😍
Events:
Sew&Bond™ - 25th of October (SOLD OUT)
Sew&Bond™ - 29th of November 2025 (SOLD OUT)
Sew&Bond™ - 13th of December 2025 (SOLD OUT)
Workshops:
Build Your Confidence in Sewing Workshop
From Fabric to Finished Tote Bag Workshop
Sewing Patterns:
Thanks for reading and happy sewing!
Bye for now, B! xx