
I Didn’t Think I Would Need To Make That Many Adjustments!
Bianca SilvaHello, hello!
My daughter’s best friend’s birthday has come round again and there have been a few specific requests for the event. 😂
She wants me to make her friend a t-shirt crop top, a skirt with buttons and a matching scrunchie.
Plus she wants the same to match and said I could just make a third for baby sister too.
Of course, why not! 😣
Anyway, the patterns that came to mind to make this are the Ellie & Mac Oversized Tee and the Ellie & Mac Rachel Skirt, which is a free pattern. For the scrunchie I will use my standard measurements of 25 x 5 inches and use ½ inch wide elastic.
We have 3 weeks to go to the birthday party, so I should have enough time to decide which patterns to make for the birthday gift, and the matching sets for my girls, I will see.
This might just be the break I need to have a breather from making my own clothes.
And I haven’t even started on my Tilly and The Buttons Indigo, so I may just start this instead.
Otherwise, the school holidays have gone by really quickly! We have 2 weeks left and they are back to school!
We have really enjoyed having them at home and nearly everyday this week, we took them to a local bike track with their bicycles.
Below is a photo of what the track looks like. It’s really well taken care of, and kids of all ages including adults take advantage of it.
I want to take my roller blades with me next time, but I should probably not attempt the track just yet. I think I may be best on the flat ground that has smaller and fewer humps for now. 😂

Stitches of the Week
Tilly and The Buttons - Marigold Trousers
The good news is that I finished them!
But I am not completely happy with the fit.
I will probably not turn to this pattern again. 😑
I made quite a few adjustments to them:
- Cut 1 inch off the top of the trousers, they were in my armpits nearly.
- Scooped out about 1.5 inches in the front crotch. Started from the top seam, gradually worked up to 1.5 inches and then reduced down again to where the front and back seams met in the crotch.
- Removed 1 inch in leg length before cutting fabric, but still removed another 3 ¾ inches from the hem.
They look ok now to a point where I feel I can wear them. I don’t like a low crotch seam or lots of baggyness around my hips. This is something I have been picky with ever since I can remember, it started in my teens.
The piping definitely gives it a nicer finish, but next time I may need to use a smaller size piping that will allow the fabric to move more instead of making it stiff. But that was all I had in my stash. 🤷🏼♀️
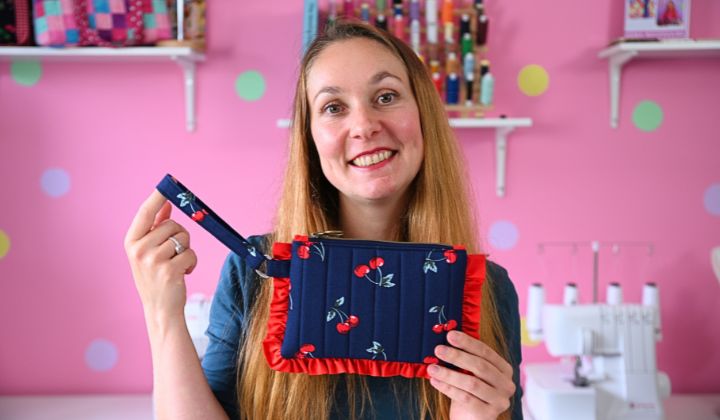
Fabric: Red cherries on navy background cotton poplin from my stash.
Size: straight size 4 with lots of modifications.
The Drama: Too many adjustments were needed for what I thought would be a simple garment to fit, especially since Tilly and The Buttons patterns tend to fit me pretty well without too much faffing.
The Win: It’s over! 😂 Will the next make be an easier one to fit? I need a break!

Take It or Leaf It Sweater - Karas Knit Eng
I made the same mistake again… on the same cable! 😂
I think I know how I did it. I simply knit the stitches for the cable in the wrong order.
Now I definitely want to fix it, but I didn’t have the courage or the time to do it this week. 😅
Someone commented on my Youtube video saying to use double pointed needles(DPN’s) to sew the section of stitches that I undo and that was a brilliant tip!
I was thinking of frogging the 8 stitches and then picking them up with a crochet hook, but using needles just sounds so much easier and I don’t know why that didn’t cross my mind.
This is one of the benefits of sharing my me mades with you!
You are able to share your tips or experiences with me, and I can in turn share it with more people so we can all benefit from it!
So thank you for commenting on my WEEKLYBEE video!
Yarn: Yarnsmiths Create Super Chunky gifted by Wool Warehouse paired with Drops silver thread.
Size: XS
Needle Size: I am using a size 6mm for the ribbing and an 8mm needle for the body. The yarn suggests a 10mm for reference.
The Drama: There are now 2 mistakes and I am building up the courage to fix them, I need to frog about 40 rows of stitches to do this. 😣

Skill Builder of the Week
Bar Tacks
A bar tack is a short, very dense zigzag stitch that reinforces areas of clothing or bags that get a lot of stress, areas like the top of a pocket, belt loops, or the base of a zipper. The job of a bar tack is to stop your seams from coming undone and to serve as a stop at the base of your zipper.

The job of a bar tack is to:
- Stop fabric from tearing in high-stress spots.
- Avoid seams coming undone.
- Keep pockets and loops secure for longer.
How can you sew one:
1- Select zigzag stitch on your machine and shorten the stitch length so the stitches are very close to each other. If you’re securing the bottom of a zipper, setting your stitch length to 0 may work best.
2- Set a narrow width to around 2–4 mm.
3- Sew for a few millimetres back and forth until it’s a neat little bar. In the case of the zipper, sew in place for a few stitches to create a stop.
Maker Spotlight
This week’s spotlight goes to @knottygnome!

Sara chose this beautiful Rifle Paper Co. fabric to make her birthday dress! The flowers are so bright and look stunning popping out on the light blue background! 😍
She made the True Bias Darla Dress with the tie back option and made a few adjustments to get it to fit well! And it looks amazing on her!
Want to be featured in my newsletter? Just reply with a pic of your make. I’d love to see what you’ve made!😍